
Overlap Reducer Solid Hardwood
- Condition : New
- Dispatch : Not given
- Brand : None
- ID# : 34973276
- Quantity : 25 items
(still available: 25) - Views : 159
- Location : United States

- Seller : tiledepotus (+136)
- Barcode : None
- Start : Wed 24 Nov 2010 17:10:45 (EDT)
- Close : Run Until Sold
- Remain : Run Until Sold
 for 1 item(s)
More Listings from This Seller view all


Seller's Description
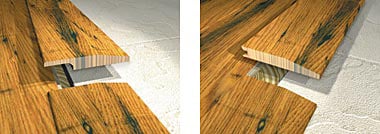
Pre-Finish Overlap Reducer - Solid
Coordinating moldings are available for all styles and colors of any Hardwood flooring you choose.
Available use for Hardwood thickness - 3/4", 9/16", 7/16", 1/2", 5/16", 3/8"
Ensure the proper transition when your hardwood flooring meets other floor coverings, such as vinyl, thin ceramic tile, or low-pile carpeting.
The Overlap Reducer should be used for floors that have been installed using the floating installation method.
Installing Hardwood Moldings and Transitions
Installation Tips:
• Moldings should be acclimated 48 hours
Moldings must be pre drilled to avoid splitting whenever they are to be secured with nails or fasteners.
• The tool of choice for cutting hardwood moldings is a 10 or 12” motorized miter saw with pre-set adjustments for the basic miter cuts at 22.5o, 45o, and 90o. A carbide tipped blade makes the best cuts. Be sure the saw blade is positioned to cut into the finished face
• On Wall Base or Quarter Round moldings, never restrict the hardwood floor’s natural contraction/expansion movement by driving the fasteners at a downward angle. Attach the moldings to the wall or vertical surface.
• Always miter cuts rather than having butt cuts when splicing. Decide the direction of the miter by cutting the molding with the long point oriented in the same direction as your natural line of vision when you enter the room.
Overlap Reducer- (Floating Method) - Used to join hardwood floors that utilize the floating installation method with floors of different heights such as vinyl, ceramic tile, or low pile carpeting.
Installation: To attached molding pre-drill and nail in appropriate 6” to 8” intervals. Do not nail less than 2”- 3” from the ends of either side. To attach the molding using glue, apply glue to the front edge of the molding. Apply one or two 1/4” beads of construction adhesive to the subfloor and seat the molding in place. It is important not to attach the reducer directly to the floating floor to allow expansion and contraction.
Listing Information
| Listing Type | Gallery Listing |
| Listing ID# | 34973276 |
| Start Time | Wed 24 Nov 2010 17:10:45 (EDT) |
| Close Time | Run Until Sold |
| Starting Bid | Fixed Price (no bidding) |
| Item Condition | New |
| Bids | 0 |
| Views | 159 |
| Dispatch Time | Not given |
| Quantity | 25 |
| Location | United States |
| Auto Extend | No |


